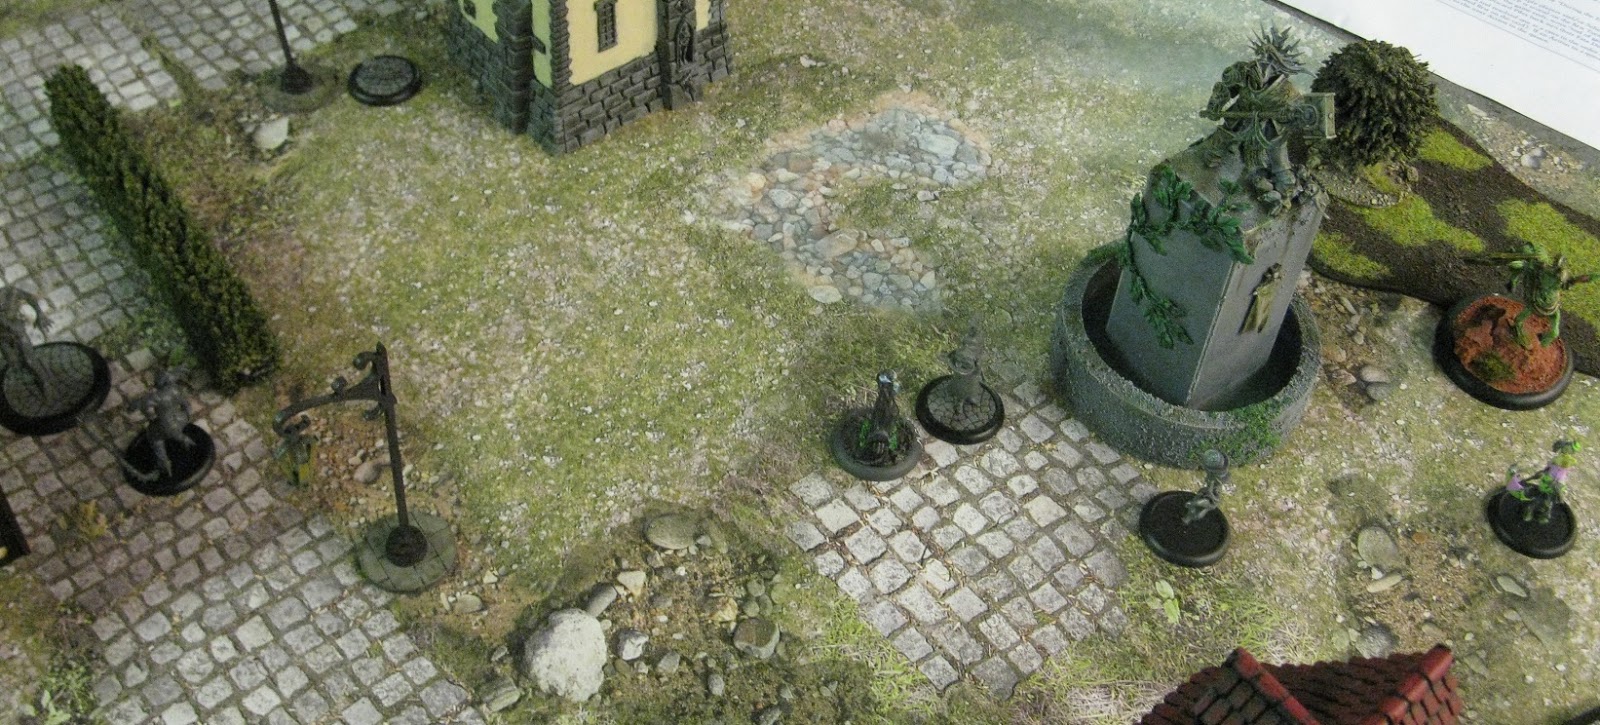
Played a game of Malifaux. We had fifty soulstones to build our gangs.
Strategy was Turf War.
Seamus with The Whisper + Copycat KillerMadame Sybelle
Mortimer
Bete Noire
2x Rotten Belle
Mourner with Grave Spirit Touch (Tagged for Claim Jump)
Schemes: Claim Jump, Outflank
I'm not entirely sure about opponent's list, but it was something like this:
Kirai Ankoku with Grave Spirit Touch + Ikiryo
Datsue Ba
Jaakuna Ubume (tagged for Claim Jump)
Lost Love
2x Gaki
2x Seishin
2x Onryo
Schemes: Search the Ruins, Claim Jump
Game started with both parties converging in the middle. Ikiryo was a scary monster that nearly butchered Bete Noire, who attempted to tie him up. Then Ikiryo was causing trouble for Mourner and Madame Sybelle, and the whole lot of my resurrectionists - I was afraid to kill it before Kirai had activated.
Mourner was the luckiest being alive... dead? Alive? Wait, what? Anyway, even if she has just seven wounds, terrifying and regeneration with enemy ignoring ruthless was quite survivable. Plenty of times Mourner went to one or two wounds remaining, but steadily climbed back to 4+ (which I would need for completing second part of Claim Jump.) Of course she healing every time enemy died nearby and being randomly healed by Madame Sybelle's Undivided Attention helped, too.
In this game Seamus was absurd. He killed Jaakuna Ubume, Gaki, an Onryo and one summoned Night Terror. That's almost one kill per turn. As a surprise bonus, Jaakuna had been the model opponent had tagged for Claim Jump. But I had some luck in drawing Red Joker to my starting hand both first and second turn.
I guess me as the player got blinded by bloodlust, and I was rather... reckless with Seamus. As he was killing things left and right, I made the mistake of killing an Onryo. Well, honestly speaking, Seamus deserved that Adversary rule.
But yeah, turn later I realized Feast of Fear doesn't actually trigger from enemy failing their terrifying check. This brought Seamus down to a healthy wound count of exactly one. And considering that every time he dealt damage to enemy models, he'd suffer one point of damage.
Opponent was losing in victory points, so he did everything he could to smack the master down he hated so much.
There were some miraculous saves for Seamus, but Adversary stacked too much odds in enemy favor. Datsue Ba weighted Seamus's sins, and they were far too heavy for him to carry any longer. It's somehow so very fitting. "Ah, hah hah! I'm killing everyone, whee! Wait... damn, now it's me who's dying!"
Losing Seamus like that robbed me of any possibility to score additional victory points from turf war, but victory was secured now. This is one aspect of Malifaux that I don't quite enjoy. Even during these few games I've played, looks like last turn can become a pointless turn too easily. I suppose in a tournament you have an incentive to try to squeeze any victory points even if it's mathematically impossible for you to win, but like this last turn can be somewhat of a lackluster.
Some sort of a note about each and every session of a board/miniature game I have played since the beginning of this blog.
Sunday, October 27, 2019
Friday, October 18, 2019
Lord Arbiter vs the Cursed
Played this 50 point game of warmachine earlier this week.
My list was:
Skorne
Lord Arbiter Hexeris [+27]- Agonizer [6]
- Basilisk Drake [8]
- Bronzeback Titan [17]
- Titan Gladiator [15]
- Aptimus Marketh [5]
Thrullg [5]
Legends of Halaak [8]
Paingiver Beast Handlers (min) [5]
Opponent had:
Cryx
Goreshade the Cursed [+28]
- Deathripper [6]
- Defiler [8]
- Desecrator [14]
Bane Lord Tartarus [6]
Pistol Wraith [5]
Pistol Wraith [5]
Wrong Eye [17]
Bane Warriors (max) [16]
Scenario was Hold the Line from main rulebook.
Bane Warriors under Occultation formed a line in the middle of Cryx forces. As Hexeris had Ashes to Ashes at his disposal, I thought I'd be able to remove most of them with Hexeris's feat. Desecrator shot Bronzeback Titan and triggered Hyper Aggressive, which set up for a rather brutal feat turn.
All but one Bane Warrior died to three Ashes to Ashes and two Basilisk sprays. Granted, I did have good luck in rolling additional targets from Ashes to Ashes.
Skorne started scoring points, but that was the only point they ever got. Sure Thrullg has magical weapons on it's tentacles, but that's of no help if it is stationary. Goreshade also used feat to bring a dead pistol wraith to contest flag on the left.
But after such a feat, Cryx was struggling an uphill battle. Last remaining Bane Warrior charged Agonizer and killed it with just one swing. Then Tartarus, who had been knocked down from a flying Desecrator, walked to bring Bronzeback Titan under Dark Shroud. Goreshade charged the titan, but failed to kill. And most importantly - did not take down bronzeback's spirit.
However, Bronzeback was still a little chilly from Voass, so all it managed to do versus Goreshade were seven points of damage.
Basilisk Drake who took an aimed shot against Bronzeback's back, on the other hand, beat all expectations and rolled a damage roll something like 4,5,6 against Goreshade.
My list was:
Skorne
Lord Arbiter Hexeris [+27]- Agonizer [6]
- Basilisk Drake [8]
- Bronzeback Titan [17]
- Titan Gladiator [15]
- Aptimus Marketh [5]
Thrullg [5]
Legends of Halaak [8]
Paingiver Beast Handlers (min) [5]
Opponent had:
Cryx
Goreshade the Cursed [+28]
- Deathripper [6]
- Defiler [8]
- Desecrator [14]
Bane Lord Tartarus [6]
Pistol Wraith [5]
Pistol Wraith [5]
Wrong Eye [17]
Bane Warriors (max) [16]
Scenario was Hold the Line from main rulebook.
Bane Warriors under Occultation formed a line in the middle of Cryx forces. As Hexeris had Ashes to Ashes at his disposal, I thought I'd be able to remove most of them with Hexeris's feat. Desecrator shot Bronzeback Titan and triggered Hyper Aggressive, which set up for a rather brutal feat turn.
All but one Bane Warrior died to three Ashes to Ashes and two Basilisk sprays. Granted, I did have good luck in rolling additional targets from Ashes to Ashes.
Skorne started scoring points, but that was the only point they ever got. Sure Thrullg has magical weapons on it's tentacles, but that's of no help if it is stationary. Goreshade also used feat to bring a dead pistol wraith to contest flag on the left.
But after such a feat, Cryx was struggling an uphill battle. Last remaining Bane Warrior charged Agonizer and killed it with just one swing. Then Tartarus, who had been knocked down from a flying Desecrator, walked to bring Bronzeback Titan under Dark Shroud. Goreshade charged the titan, but failed to kill. And most importantly - did not take down bronzeback's spirit.
However, Bronzeback was still a little chilly from Voass, so all it managed to do versus Goreshade were seven points of damage.
Basilisk Drake who took an aimed shot against Bronzeback's back, on the other hand, beat all expectations and rolled a damage roll something like 4,5,6 against Goreshade.
Sunday, October 13, 2019
Never Born Killers
Played my third game of Malifaux.
This time it was 50 soul stones, and a hefty increase of 15 stones did lengthen the game quite a bit.
However, my list was:Seamus + Copycat Killer
Madame Sybelle
Mortimer
Bete Noire
2x Rotten Belle
Mourner with Grave Spirit Touch
Schemes: Breakthrough, Search the Ruins
Opponent had an assortment of Neverborn, which would also have been my second choice as a faction, pfft...
Anyway, opponent had:
Dreamer with Ancient Pact + Lord Chompy Bits with Inhuman Reflexes
Coppelius
Teddy with Inhuman Reflexes
Doppelganger
3x Daydreams
Schemes: Breakthrough, Search the Ruins
Strategy was Plant the Explosives.
I wanted to make a combo with Blasphemous Ritual to get Focused condition to my whole crew. Well, this was nice enough I guess, but it clumped my forces so that I felt like I had a slow start. When I aimed for a fast start.
It wasn't only a feeling, though. Or maybe Neverborn were absurdly fast. I don't know. However the case, they started scoring points right on turn two, both from schemes and strategies. I had to wait for turn three to even get my first point.
I was terrified of Teddy and Lord Chompy Bits. Seamus tried to take a shot against Lord Chompy Bits early in the game but missed. I had hoped to score a lucky kill, but now that I check that monster's stats... Yeah, only severe damage would have done anything useful, as the thing has regeneration. Oh well. Good thing Seamus missed, then.
Most of opponent's forces stormed to my side from east. Doppelganger a was lone approacher from west, or, kind of at least. Next time I know a little better than to summon mindless zombies with willpower of 3 easily within range of bend realities and whatnot.
I got stuck in the middle, and Mortimer nearly died to a charging summoned enemy. Hilariously enough whatever the creature was, it managed to kill itself by using some sort of ability that dealt damage to either my model or back to itself.
Bete Noire tried to do something to Coppelius, but didn't do much. After soaking some enemy attacks, it got buried. This was my plan to get her to enemy side of the board to place the explosives. Woefully late she was.
Seamus climbed up the ruined building, and tried to shoot things from vantage point. He shot a daydream and planted scheme markers. We did measure distance incorrectly, though. Maybe writing this makes me remember it better next time.
I had pretty much given up on my deployment zone. After all, there was only a Rotten Belle and Madame Sybelle holding down Lord Chompy Bits, Dreamer, some summoned beast and Coppelius.
Bete Noire had sprung up from a corpse on opponent's side of the board and managed to score revealed breakthrough after a summoned Alp was killed. As Teddy was nearing in, I thought I'd come and take two flintlock shots at it, when copycat killer switched places with Seamus.
Now, wouldn't that have been grand. Except that something activated and had Bete Noire fail a willpower check and put up one more summoned demon into play. In melee range with Seamus. There went my plan, and I had to waste Cause for Celebration for a melee attack, which did nothing anyway. Seamus then disengaged and... whoops. Placed a scheme marker. Which you cannot do if you have disengaged that activation. Curses.
And Rotten Belle, engaged by a summoned creature, disengaged and picked up Neverborn strategy marker, which she cannot do because she disengaged.
This foils my brilliant move of using Mortimer's ability to move undead models 3" towards target, moving Rotten Belle and then placing a scheme marker with her on opponent's deployment zone.
Well, this didn't cost me a victory. It cost me a draw.
But the game was again very different. Opponent killed one mindless zombie from me, and I killed a daydream, doppelganger and some summoned beasts. Focus was entirely elsewhere than in maximum carnage, which is refreshing in wargames. Regardless of game, if you roll over opposing army it often means you win anyway even if you haven't completed whatever objectives you might have. At least in this scenario, if opponent has scored that one victory point more and you cannot reach to get one or two yourself, you gain nothing even if you wipe off the enemy crew.
This time it was 50 soul stones, and a hefty increase of 15 stones did lengthen the game quite a bit.
However, my list was:Seamus + Copycat Killer
Madame Sybelle
Mortimer
Bete Noire
2x Rotten Belle
Mourner with Grave Spirit Touch
Schemes: Breakthrough, Search the Ruins
Opponent had an assortment of Neverborn, which would also have been my second choice as a faction, pfft...
Anyway, opponent had:
Dreamer with Ancient Pact + Lord Chompy Bits with Inhuman Reflexes
Coppelius
Teddy with Inhuman Reflexes
Doppelganger
3x Daydreams
Schemes: Breakthrough, Search the Ruins
Strategy was Plant the Explosives.
I wanted to make a combo with Blasphemous Ritual to get Focused condition to my whole crew. Well, this was nice enough I guess, but it clumped my forces so that I felt like I had a slow start. When I aimed for a fast start.
It wasn't only a feeling, though. Or maybe Neverborn were absurdly fast. I don't know. However the case, they started scoring points right on turn two, both from schemes and strategies. I had to wait for turn three to even get my first point.
I was terrified of Teddy and Lord Chompy Bits. Seamus tried to take a shot against Lord Chompy Bits early in the game but missed. I had hoped to score a lucky kill, but now that I check that monster's stats... Yeah, only severe damage would have done anything useful, as the thing has regeneration. Oh well. Good thing Seamus missed, then.
Most of opponent's forces stormed to my side from east. Doppelganger a was lone approacher from west, or, kind of at least. Next time I know a little better than to summon mindless zombies with willpower of 3 easily within range of bend realities and whatnot.
I got stuck in the middle, and Mortimer nearly died to a charging summoned enemy. Hilariously enough whatever the creature was, it managed to kill itself by using some sort of ability that dealt damage to either my model or back to itself.
Bete Noire tried to do something to Coppelius, but didn't do much. After soaking some enemy attacks, it got buried. This was my plan to get her to enemy side of the board to place the explosives. Woefully late she was.
Seamus climbed up the ruined building, and tried to shoot things from vantage point. He shot a daydream and planted scheme markers. We did measure distance incorrectly, though. Maybe writing this makes me remember it better next time.
I had pretty much given up on my deployment zone. After all, there was only a Rotten Belle and Madame Sybelle holding down Lord Chompy Bits, Dreamer, some summoned beast and Coppelius.
Bete Noire had sprung up from a corpse on opponent's side of the board and managed to score revealed breakthrough after a summoned Alp was killed. As Teddy was nearing in, I thought I'd come and take two flintlock shots at it, when copycat killer switched places with Seamus.
Now, wouldn't that have been grand. Except that something activated and had Bete Noire fail a willpower check and put up one more summoned demon into play. In melee range with Seamus. There went my plan, and I had to waste Cause for Celebration for a melee attack, which did nothing anyway. Seamus then disengaged and... whoops. Placed a scheme marker. Which you cannot do if you have disengaged that activation. Curses.
And Rotten Belle, engaged by a summoned creature, disengaged and picked up Neverborn strategy marker, which she cannot do because she disengaged.
This foils my brilliant move of using Mortimer's ability to move undead models 3" towards target, moving Rotten Belle and then placing a scheme marker with her on opponent's deployment zone.
Well, this didn't cost me a victory. It cost me a draw.
But the game was again very different. Opponent killed one mindless zombie from me, and I killed a daydream, doppelganger and some summoned beasts. Focus was entirely elsewhere than in maximum carnage, which is refreshing in wargames. Regardless of game, if you roll over opposing army it often means you win anyway even if you haven't completed whatever objectives you might have. At least in this scenario, if opponent has scored that one victory point more and you cannot reach to get one or two yourself, you gain nothing even if you wipe off the enemy crew.
Friday, October 4, 2019
Lonely Nightmare
Finally one of the bigger models for Kingdom Death is ready. It's the Lonely Tree. So now that it's painted, I suppose it is safe to assume it won't be drawn from terrain deck ever again.
Thursday, October 3, 2019
Thief in the night
Last game of round three for Vanguard campaign.
My twilight kin was against the basileans in this ones. Again my company was the aggressor. What can I say. Executrix Nirha just wants to wake up people.
Round was 175 points, and I had Executrix Nirha, Reaper Guards Nista and Holrotho, Quartermaster Poosk, Summoner Crone Catrul and Bruberdge the Butcher in my team, and was facing a million immortal Basileans. I might be exaggerating somewhat.
First round we had some missile action. A member of Basilean sisterhood shot Nista down right on the first attempt. By now no-one is surprised when it was this one particular crossbowyer who indeed is a force to be reckoned with.
Not to look any worse, Quartermaster Poosk did exactly same thing to some Basilean of which I don't recognize. Catrul ventures too deep into the forest, as she was easily caught into melee there. Fortunately I had packed a potion of haste to Butcher, and he was able to run into the woods and even take a swing with second action. And later even a forced fatigue swing. One grunt was down, but by then the woods were already flooded with panthers and paladins.
Poosk was being charged by veteran sister and another member of the enemy team, and she was struck down like a twig.
In terms of kills it was even, but then again, I had five models remaining and opponent had eight. Or nine, if you count the very sleepy commander.
Fortunately Catrul was adept at summoning Reapers, who stalled Basilean ranged brigade long enough for executrix Nirha to make a major breakthrough that was littered with Basilean corpses. Unfortunately Holrotho had perished, too. Citizen levy had also been an early casualty, so my warband was broken.
At least I passed nerve tests when it came to fleeing models. However the case, my model count was too low now to effectively search every tent. I might have had one go at the Basilean leader, but situation never came up. The commander was that sleepy headed.
I should probably have chosen to be the defender, because those couple early casualties really took a toll on my tent searching capability. As a defender I probably couldn't have stopped that tiny army of humans from ransacking my tents, but Nirha is quite the murder machine.
Post-game both Poosk and Holrotho received horrible scars and Nista made full recovery. Exploration phase was horrifying. My warband encountered a thief. And to make matters worse, that thief made off with two of my campaign golds. So I only got twelve coins from this round. But I try to think that maybe my warband survives this setback. Maybe...
My twilight kin was against the basileans in this ones. Again my company was the aggressor. What can I say. Executrix Nirha just wants to wake up people.
Round was 175 points, and I had Executrix Nirha, Reaper Guards Nista and Holrotho, Quartermaster Poosk, Summoner Crone Catrul and Bruberdge the Butcher in my team, and was facing a million immortal Basileans. I might be exaggerating somewhat.
First round we had some missile action. A member of Basilean sisterhood shot Nista down right on the first attempt. By now no-one is surprised when it was this one particular crossbowyer who indeed is a force to be reckoned with.
Not to look any worse, Quartermaster Poosk did exactly same thing to some Basilean of which I don't recognize. Catrul ventures too deep into the forest, as she was easily caught into melee there. Fortunately I had packed a potion of haste to Butcher, and he was able to run into the woods and even take a swing with second action. And later even a forced fatigue swing. One grunt was down, but by then the woods were already flooded with panthers and paladins.
Poosk was being charged by veteran sister and another member of the enemy team, and she was struck down like a twig.
In terms of kills it was even, but then again, I had five models remaining and opponent had eight. Or nine, if you count the very sleepy commander.
Fortunately Catrul was adept at summoning Reapers, who stalled Basilean ranged brigade long enough for executrix Nirha to make a major breakthrough that was littered with Basilean corpses. Unfortunately Holrotho had perished, too. Citizen levy had also been an early casualty, so my warband was broken.
At least I passed nerve tests when it came to fleeing models. However the case, my model count was too low now to effectively search every tent. I might have had one go at the Basilean leader, but situation never came up. The commander was that sleepy headed.
I should probably have chosen to be the defender, because those couple early casualties really took a toll on my tent searching capability. As a defender I probably couldn't have stopped that tiny army of humans from ransacking my tents, but Nirha is quite the murder machine.
Post-game both Poosk and Holrotho received horrible scars and Nista made full recovery. Exploration phase was horrifying. My warband encountered a thief. And to make matters worse, that thief made off with two of my campaign golds. So I only got twelve coins from this round. But I try to think that maybe my warband survives this setback. Maybe...
Saturday, September 21, 2019
Nostalgic Annihilation
Played a 50 point game of Warmachine earlier this week. It was a 50 point game with random scenario from main rulebook. It was Annihilation.
Skorne
Lord Arbiter Hexeris [+27]
- Agonizer [6]
- Basilisk Drake [8]
- Bronzeback Titan [17]
- Tiberion [19]
- Aptimus Marketh [5]
Paingiver Bloodrunner Master Tormentor [4]
Legends of Halaak [8]
Paingiver Beast Handlers (min) [5]
Venator Flayer Cannon Crew [5]
vs
Cygnar
Commander Coleman Stryker [+30]- Ironclad [12]
- Lancer [10]
- Lancer [10]
Rorsh [15]
Rangers [9]
Steelhead Riflemen (min) [8]
Stormguard Infantry (max) [15]
Cygnar started. And I have to say Annihilation was a great change of focus. It was actually fun to play a simple scenario with no flags, objectives, zones and whatnot.
Sure, it's a poorly balanced scenario for those who want to meticulously calculate their wins at all cost - especially shooty list could have just sniped a single solo from my list and retreat for remaining rounds, in theory at least.
But at least here was a good match up.
Cygnar had a devastating start when I lost not one but two members of Legends of Halaak. I had forgotten about their no-knockdown ability and left one of them standing away from base contact. Earthquake fell, and then rangers started shooting. Def 16 didn't help against Rangers, though, and a lucky hit downed another Legend.
Hexeris used feat next, and I think it was okay turn. Six stormguards, three steelheads and four rangers fell.
Opponent got rid of Master Tormentor and the last remaining Legend and used following turn for positioning. Ironclad and Rorsh & Brine were flanking. Bronzeback Titan was looking scary enough and Brine didn't have the courage to charge him. Hexeris was caught by Ironclad, but used Repulsion to get away.
Stryker had his feat going on after losing one Lancer. Though Tiberion did fine work, even he wasn't able to wreck Lancer with +5 arm buff in one turn.
Brine finally engage with Pig Farm on. And I will probably have nightmares from those damage rolls for times to come, as they were absurd. Second last attack did only two points of damage or so, and last attack scored no damage. In all other damage rolls there was not a single die below four pips, with no shortage of fives and sixes.
Bronzeback was left with something like three hit boxes remaining.
And then Bronzeback frenzied. Well, at least he needed that Unyielding. But this fail check was a disaster.
I could have brought Tiberion to deal with Ironclad after Hexeris would destroy Lancer. Bronzeback could have killed Brine. But not when I wasn't able to activate it.
It was second last turn in game, so I decided to try assassination instead.
Hexeris destroyed Lancer but failed to drop boosted Black Spot on Blurred Stryker.
Then Basilisk Drake failed to hit, too.
Tiberion got a free charge against Stryker, but missed boosted charge attack. And all other attacks too, except for one that dealt five points in. I had three boosted POW 20 coming, hitting on 9+. One could have even had a damage boost. But only a single hit with poor damage. Oh, and obviously shield and tusk attacks missed, too.
And to rub it in, last attack that hit scored critical smite, which would have pretty much guaranteed a POW 14 spray hit from Basilisk Drake... that had already activated.
Earthquake knocked Hexeris down, and then Rorsh came to shoot Lord Arbiter very dead.
Skorne
Lord Arbiter Hexeris [+27]
- Agonizer [6]
- Basilisk Drake [8]
- Bronzeback Titan [17]
- Tiberion [19]
- Aptimus Marketh [5]
Paingiver Bloodrunner Master Tormentor [4]
Legends of Halaak [8]
Paingiver Beast Handlers (min) [5]
Venator Flayer Cannon Crew [5]
vs
Cygnar
Commander Coleman Stryker [+30]- Ironclad [12]
- Lancer [10]
- Lancer [10]
Rorsh [15]
Rangers [9]
Steelhead Riflemen (min) [8]
Stormguard Infantry (max) [15]
Cygnar started. And I have to say Annihilation was a great change of focus. It was actually fun to play a simple scenario with no flags, objectives, zones and whatnot.
Sure, it's a poorly balanced scenario for those who want to meticulously calculate their wins at all cost - especially shooty list could have just sniped a single solo from my list and retreat for remaining rounds, in theory at least.
But at least here was a good match up.
Cygnar had a devastating start when I lost not one but two members of Legends of Halaak. I had forgotten about their no-knockdown ability and left one of them standing away from base contact. Earthquake fell, and then rangers started shooting. Def 16 didn't help against Rangers, though, and a lucky hit downed another Legend.
Hexeris used feat next, and I think it was okay turn. Six stormguards, three steelheads and four rangers fell.
Opponent got rid of Master Tormentor and the last remaining Legend and used following turn for positioning. Ironclad and Rorsh & Brine were flanking. Bronzeback Titan was looking scary enough and Brine didn't have the courage to charge him. Hexeris was caught by Ironclad, but used Repulsion to get away.
Stryker had his feat going on after losing one Lancer. Though Tiberion did fine work, even he wasn't able to wreck Lancer with +5 arm buff in one turn.
Brine finally engage with Pig Farm on. And I will probably have nightmares from those damage rolls for times to come, as they were absurd. Second last attack did only two points of damage or so, and last attack scored no damage. In all other damage rolls there was not a single die below four pips, with no shortage of fives and sixes.
Bronzeback was left with something like three hit boxes remaining.
And then Bronzeback frenzied. Well, at least he needed that Unyielding. But this fail check was a disaster.
I could have brought Tiberion to deal with Ironclad after Hexeris would destroy Lancer. Bronzeback could have killed Brine. But not when I wasn't able to activate it.
It was second last turn in game, so I decided to try assassination instead.
Hexeris destroyed Lancer but failed to drop boosted Black Spot on Blurred Stryker.
Then Basilisk Drake failed to hit, too.
Tiberion got a free charge against Stryker, but missed boosted charge attack. And all other attacks too, except for one that dealt five points in. I had three boosted POW 20 coming, hitting on 9+. One could have even had a damage boost. But only a single hit with poor damage. Oh, and obviously shield and tusk attacks missed, too.
And to rub it in, last attack that hit scored critical smite, which would have pretty much guaranteed a POW 14 spray hit from Basilisk Drake... that had already activated.
Earthquake knocked Hexeris down, and then Rorsh came to shoot Lord Arbiter very dead.
Thursday, September 19, 2019
Effortless painting
I took a picture of these just to make a painting update.
What we have here is a piece of terrain (a cage of some sorts), three models and markers for Malifaux.
Models are rushed paintjobs with Citadel Contrast Colors. I'm pleased with the results considering how much time and effort went into making these. Which wasn't much of either. Models are not official ones. They're Nolzur's Marvelous Miniatures or whatever those pre-primed D&D miniatures are called. Some of their scale matches that of Malifaux' quite nicely.
Then I made a multi-purpose markers for Malifaux. Kingdom Death bases are two pieces each, so they are like four-in-one markers now. Each of the eight markers can function as miscellaneous marker or Corpse, Scheme or Strategy marker.
What we have here is a piece of terrain (a cage of some sorts), three models and markers for Malifaux.
Models are rushed paintjobs with Citadel Contrast Colors. I'm pleased with the results considering how much time and effort went into making these. Which wasn't much of either. Models are not official ones. They're Nolzur's Marvelous Miniatures or whatever those pre-primed D&D miniatures are called. Some of their scale matches that of Malifaux' quite nicely.
Then I made a multi-purpose markers for Malifaux. Kingdom Death bases are two pieces each, so they are like four-in-one markers now. Each of the eight markers can function as miscellaneous marker or Corpse, Scheme or Strategy marker.
Wednesday, September 18, 2019
Second Game of Malifaux
So I had my second game.
It was 35 soul stones. Is just added a Mindless Zombie to my crew, because last time I felt that one just... isn't enough.
We still kept the simple scenario of Reckoning.
Overall, the game went on slightly more fluidly than last time, with less time spent on scouring details from rulebook. Some form of tactical thinking may have also developed, since last game neither of us used Concentrate even once. This time it was used almost every turn with at least one model.
Maybe next time I'd feel confident enough to try a different scenario.
However, the game itself.
My team was:
Seamus + Copycat Killer
Rotten Belle
Bete Noire
Madame Sybelle
Mourner
Mindless Zombie
4 soulstones
Schemes: Power Ritual, Deliver a Message
vs.
Dr. McMourning + Zombie Chihuahua
Sebastian
Kentauroi (with Grave Spirit's Touch)
Flesh Construct
Nurse
4 soulstones
Schemes: Power Ritual, Claim Jump (Flesh Construct)
We had corner deployment. I had this great plan to plant Mourner's corpse marker within 3" of corner, and eventually when Bete Noire would bury herself, she'd come up there and replace corpse with scheme marker and place schemes to both adjacent with dynamic duo of Seamus and Copycat Killer. Nice plan, eh?
Well, except that first activation in the whole game (flesh construct) gave me a hint that opponent was aiming for Power Ritual, too. And opponent had this horribly fast unit of Kentauroi.
Seamus took a shot against the Kentauroi and dealt a severe injury. I was surprised that the minion fell down to one hit point remaining. I had Red Joker in my hand, so I could have killed Kentauroi with one hit.
Good thing I did not. This prompted a reckless action from McMourning - he charged Seamus and replied in kind with four damage points and two poison counters. It was severe injury that I lowered with a soul stone. He still had one action remaining, so I used Red Joker for Seamus' defense. Even a minor injury with two poison counters would have eventually caused Seamus' death.
My Mourner comes to deliver a message to McMourning. There may have been some bad puns involved.
Bete Noire kept harassing Chihuahua. I just wanted an easy kill for Reckoning, but I didn't pay attention to the fact that even had Bete Noire succeeded, I would've gained nothing because of Chihuahua's Insignificant rule. Oh well. At least the doggie received some good pets.
Seamus killed Sebastian on the northern left corner of board. But not before Sebastian could score a point from Power Ritual.
Throughout this time Kentauroi had been healing a little, and came to contest lower right corner, where I hadn't had time to plant a Scheme marker with Rotten Belle. I realized I wouldn't be able to complete Power Ritual's end condition. And it was all because Seamus missed one attack on Sebastian.
Madame Sybelle had been on the middle for too long. Flesh Construct was attacking her. I was suspecting opponent might have Claim Jump again, since Flesh Construct is such a perfect piece for that scheme.
Madame used up all my remaining soulstones. But against all odds she did survive long enough. When she succumbed on last round of the game, she had a stack of six Poison counters after McMourning attacked her.
Seamus activated and dropped a Scheme Marker close enough to McMourning to deliver the final message.
Score was 3-4 in favor of Seamus.
Opponent was quite terrified of Seamus, and I have to agree the flintlock pistol has absurd damage track. Even minor injury deals as much damage as severes on some models. After two games I can't make an accurate judgement, but on the other hand... in this game at least it was Seamus who pretty much did all the job. All other models in my team were not doing any damage at all that was of consequence. Mourner delivered the original message to McMourning and that's it. Anything else my models did were just standing in the way of enemy.
It was 35 soul stones. Is just added a Mindless Zombie to my crew, because last time I felt that one just... isn't enough.
We still kept the simple scenario of Reckoning.
Overall, the game went on slightly more fluidly than last time, with less time spent on scouring details from rulebook. Some form of tactical thinking may have also developed, since last game neither of us used Concentrate even once. This time it was used almost every turn with at least one model.
Maybe next time I'd feel confident enough to try a different scenario.
However, the game itself.
My team was:
Seamus + Copycat Killer
Rotten Belle
Bete Noire
Madame Sybelle
Mourner
Mindless Zombie
4 soulstones
Schemes: Power Ritual, Deliver a Message
vs.
Dr. McMourning + Zombie Chihuahua
Sebastian
Kentauroi (with Grave Spirit's Touch)
Flesh Construct
Nurse
4 soulstones
Schemes: Power Ritual, Claim Jump (Flesh Construct)
We had corner deployment. I had this great plan to plant Mourner's corpse marker within 3" of corner, and eventually when Bete Noire would bury herself, she'd come up there and replace corpse with scheme marker and place schemes to both adjacent with dynamic duo of Seamus and Copycat Killer. Nice plan, eh?
Well, except that first activation in the whole game (flesh construct) gave me a hint that opponent was aiming for Power Ritual, too. And opponent had this horribly fast unit of Kentauroi.
Seamus took a shot against the Kentauroi and dealt a severe injury. I was surprised that the minion fell down to one hit point remaining. I had Red Joker in my hand, so I could have killed Kentauroi with one hit.
Good thing I did not. This prompted a reckless action from McMourning - he charged Seamus and replied in kind with four damage points and two poison counters. It was severe injury that I lowered with a soul stone. He still had one action remaining, so I used Red Joker for Seamus' defense. Even a minor injury with two poison counters would have eventually caused Seamus' death.
My Mourner comes to deliver a message to McMourning. There may have been some bad puns involved.
Bete Noire kept harassing Chihuahua. I just wanted an easy kill for Reckoning, but I didn't pay attention to the fact that even had Bete Noire succeeded, I would've gained nothing because of Chihuahua's Insignificant rule. Oh well. At least the doggie received some good pets.
Seamus killed Sebastian on the northern left corner of board. But not before Sebastian could score a point from Power Ritual.
Throughout this time Kentauroi had been healing a little, and came to contest lower right corner, where I hadn't had time to plant a Scheme marker with Rotten Belle. I realized I wouldn't be able to complete Power Ritual's end condition. And it was all because Seamus missed one attack on Sebastian.
Madame Sybelle had been on the middle for too long. Flesh Construct was attacking her. I was suspecting opponent might have Claim Jump again, since Flesh Construct is such a perfect piece for that scheme.
Madame used up all my remaining soulstones. But against all odds she did survive long enough. When she succumbed on last round of the game, she had a stack of six Poison counters after McMourning attacked her.
Seamus activated and dropped a Scheme Marker close enough to McMourning to deliver the final message.
Score was 3-4 in favor of Seamus.
Opponent was quite terrified of Seamus, and I have to agree the flintlock pistol has absurd damage track. Even minor injury deals as much damage as severes on some models. After two games I can't make an accurate judgement, but on the other hand... in this game at least it was Seamus who pretty much did all the job. All other models in my team were not doing any damage at all that was of consequence. Mourner delivered the original message to McMourning and that's it. Anything else my models did were just standing in the way of enemy.
Labels:
35ss,
gg0,
malifaux,
mcmourning,
resurrectionists,
seamus
Subscribe to:
Posts (Atom)